Pages

Monday, November 21, 2016

Four Homemade Holiday Gifts that aren't Cookies

The cooling temperatures this past week have really amped my brain up for the holidays with a certain urgency. The warm November tricked me into thinking I had more time. However, Christmas will be here before we know it! So I spent the weekend preparing little gifts so I don't have to think about it too much in December during crunch time.


I so enjoy giving my family gifts. I think all year about what to give my kids on Christmas morning, and think about what to get my in-laws and best of friends. However, there are a lot of people on my list that I just can't spend a lot of money on or spend hours trying to find the perfect gift. Teachers, mailmen, real estate agents, piano teachers, dentists, doctors, etc. However, these people are part of our lives and I hope to show them they are appreciated.

I love making Christmas cookies....and I will be making and distributing lots this year as always! Sometimes, though, I like to have some non cookie gifts to give. One can only eat so many cookies (because most people don't have the same cookie capacity as me, as well as my lack on diminishing returns on food). These are cute, easy, inexpensive gifts that I hope anyone would like to get. I know I would!

Oh, and if you are one of the fore-mentioned people, sorry for the spoiler. This is what you're getting for Christmas.

Homemade Vanilla Extract


I've done a tutorial on how easy it is to make homemade Vanilla extract in large quantities (because those little containers only give you a couple of recipes worth!). All you need are vanilla beans and vodka. Cheap vodka, at that! I've been saving tonic water bottles since summer when I was on my gin-and-tonic kick. I removed the labels and cleaned the jars.

I slit one vanilla pod (I use these Whole Madagascar Vanilla Beans from Amazon and love them) and place it int he jar. Fill the jar with Vodka. An address label with a note of love and a cute little decoration and these are good to go! Plus, look how gorgeous they look sitting on my kitchen window steeping.


This is one you have to start ahead. The extract should sit for about a month before gifting it.


Sugar Scrubs

These are pretty popular DIY gifts and for good reason. They are cheap, practical, and a nice little treat for somebody who probably doesn't buy or make this kind of stuff for themselves.

All you really need is sugar, brown or white, oil (I use coconut oil, but you can use olive, grapeseed, etc.), and any additions you want. I made one with brown sugar and coffee, and another with lavendar and vanilla (from my Vanilla pods, of course!). Put them in cute jars, add a label, a little decoration, and there's another little gift down!

Side note: Check out the dollar section at Target for cute jars and decorations for your DIY gifts. Then look at the rest of Target for everything else you need. And don't need. And will wonder why you bought later.


Unique Candle Decorations

This one is great for the kids. They can give them to grandparents, teachers, coaches, aunts and uncles, etc. I used this tutorial from Baby First Blog. All you need is white pillar candles, tissue paper, wax paper, permanent markers, and a hair dryer.


I also found these cute tags that the kids can color and sign to give as gifts. Taking personal touch to a whole new level!

Homemade Breadcrumbs/Meatball mix


This one I came up with just today. I am always saving bread ends, crusts from sandwiches, stale parts, etc. and make them into breadcrumbs every once in a while. I use breadcrumbs to make meatballs and meatloaf. I'm making a kitchen basket for my stepson and his girlfriend and I thought it'd be fun to include these homemade seasoned breadcrumbs for making meatballs.

This is my approximate recipe:

Seasoned Breadcrumbs for Meatballs or Meatloaf

Makes two jars or "recipes"

4 cups breadcrumbs
1 Tbsp. dried parsley
1 tsp. garlic powder
1 tsp. onion powder
1 tsp. oregano
1/3 cup parmesan cheese
1/2 tsp. salt
1/2 tsp. pepper

Blend together and place into jars. Freeze. Due to the cheese and the fresh breadcrumbs, this needs to be kept in the freezer. If you had dry breadcrumbs and left out the cheese, it can be shelf stable, You'll just have to add the cheese to the recipe. On the label, I wrote;

Meatball Recipe:
 - I jar breadcrumbs
 - 1 lb ground beef
 - 1 egg
 - 2 Tbsp. ketchup

350 degrees 20-30 minutes. I assume the maker will know the time to bake will depend on the size of the meatballs. If you don't think they will, be more specific in your instructions. For example, say "Make golf-ball sized meatballs and bake in the oven for  25 minutes."


Happy gift giving!!

Thursday, November 10, 2016

Healthy Whole Wheat Tortillas

Taco night! Does your family have taco night? Ours is on Tuesday, of course. I have so many taco recipes it never gets old. Classic ground beef tacos, shrimp tacos, pulled pork tacos, texas tacos, steak....you get it. This past Tuesday we had vegetarian loaded guacamole and black bean tacos. With home made tortillas.


I love tortillas. They are a nice change from bread and can give a lot of flavor to your taco (it can also totally ruin taco night if you have bad or stale tortillas or corn tortillas that don't hold together). They are also good with butter. Or peanut butter and jelly. This is a nice healthy recipe and while it takes a little time to roll them out, its easy work. I let my little ones help me. Fresh tortillas beat store bought any day!

This recipe uses whole wheat flour and coconut oil for the fat instead of vegetable shortening or oil. Butter or lard would be good too. Either way, no added ingredients or preservatives.

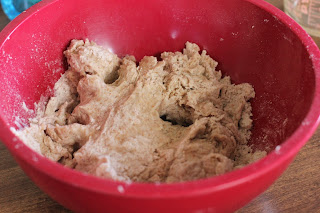
You make it kind of like a pie crust/biscuit. Mix flour, salt, and baking powder, then use your hands or a pastry cutter to get the oil distributed. Add water and mix until you form a ball. Then make the tortillas!


Rub the coconut oil into the flour with our fingers

Starting to come together


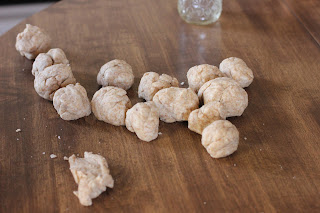
16 pieces

Roll into balls


The imperfect tortilla makes the perfect taco!

Fry

Bubbles!

Tortillas

Wholesome deliciousness

Approved! (Night time photos are the worst)


Loaded Guac and Black Bean veggie tacos (recipe link above)

Whole Wheat Tortillas with Coconut oil

3 Cups Whole wheat flour or Canadian Whole wheat flour
1 1/2 tsp. salt
1 1/2 tsp. baking powder
1/2 cup coconut oil
3/4 cup hot water

Mix Flour, salt, and baking powder together. Incorporate coconut oil with fingers or pastry blender until its well mixed. Add in water, mix, then knead with hands until it forms a ball. Divide into 12-16 portions depending on the size you want (you can even do 8 for burrito size). Roll out with a rolling pin. Do not stack one on top of the other - separate by wax paper or just cook them as you go. Heat a cast iron skillet (or non-stick) over medium heat. No cooking oil is necessary. Cook tortillas 1 minute on first side and about 30 seconds on the second side. Keep cooking until you have nice brown bits on either side.

These are best served fresh and warm. Otherwise, wrap in a towel for 4-5 hours, or store in an airtight bag for a few days. They freeze really well!

Monday, November 7, 2016

Back to Blogging and Whole Wheat Sandwich Bread

Its time, my friends, time to start blogging again! I've been busy - no-time-to-myself busy. This is why:


Yep, I had another baby! Maysa Jean was born in March after a very trying pregnancy. Whatever down time I had then was spend trying to rest. Since she has been born I've been enjoying my family, enjoying her infancy, and willing her to be little as long as possible (along with my other babies!). She is an incredible baby - happy, strong, healthy....we are all smitten with this last addition to our family.

While that is mostly still true, I'm trying to take some time for myself. Even if that means I set up an activity for the older kids, let them watch some TV, or let Maysa play with toys by my feet, I want to start writing again. The words are always in my head. Maybe I'll start making tea and try to figure out what is so great about it while I write.

My first returning post is about bread. I couldn't think of a better recipe to share than the one I've been making over and over lately for school lunches and breakfast toast. Or, my before bed snack to get me through the long hours of the night. Its a wonderful, nutritious bread that is great for sandwiches...something that is sometimes hard to come by with home made bread. It can tend to come out gummy or crumby and hard to slice - but this bread has always worked out perfectly for me.

It starts with a trick I learned with a first rising. While normally, you'd let yeast proof in warm water for 5 minutes or so, this recipe has the yeast proofing in a flour slurry for half an hour. I think it really gives the yeast a better start. It also lets the little bit of while flour you use develop its gluten so you can use a whole wheat flour for the rest of it.

Before and after the yeast develops


The whole wheat flour I use for baking is called Canadian whole wheat flour. Its processed differently than others in that the germ is actually separated from the wheat, but you still get every part of the grain. This means its better for baked goods because moisture can get to the endosperm of the wheat and develop the gluten there, making for a better structured loaf. My Mom gets this nice flour for me from a Mennonite store in Wisconsin. However, if you don't live by a Mennonite store, I'd recommend this:

Canadian Whole Wheat flour

Once you try it in place of the whole wheat flour you've been using, you won't go back!

After the yeast slurry, its your basic bread recipe. Milk gives it some heartiness, salt brings out the flavors, and honey sweetens it slightly. I put a water bath in my oven while this bakes to help keep it moist. This bread takes some time due to risings but its well worth it!

I don't add flour until the dough forms a good ball - I get it to this point, where it is still very sticky. I think this is better for a sandwich bread.

Before Rising...

After Rising!

Kneaded a few times


Formed into a ball - this is the best I could do to get a picture of how I gather it at the bottom to give it a smooth top

Keep pinching in the middle until it spreads out into a loaf shape


Rising up out of the pans

My water bath

Bread! I think I let it rise a little long because the top got a little bubbly, but that's OK. 


Perfect for my kids' PB&Js!

Recipe

Whole Wheat Sandwich Bread

1 cup warm water (115 degrees)
1/2 cup all purpose flour
4 tsp. active dry yeast
2 cups whole milk
4 Tbsp. honey
3 tsp. salt
5-6 cups Whole Wheat Flour (Canadian is best - I use this: Canadian Whole Wheat Flour)

Put warm water, flour, and yeast in the bowl of your stand mixer. If you don't have a mixer, no worry, this is a great bread to make by hand. You'll just have to knead it. Mix it to a slurry, cover, and let sit for half an hour.

Add in milk (warm to about body temperature....I microwaved it for 1 minute) and honey and mix, then add in 5 cups of the Whole Wheat flour. Mix with the paddle attachment for 4-5 minutes. Add in more flour until you get a very sticky dough, but it still gathers around the hook. You can refer to my picture above.

Put into a greased bowl and let rise for 1-1 1/2 hours or until double. Turn out and knead a few times, then cut it in half. Make a round out of each half by pushing the dough under with your fingers while to top smooths out. I tried to get a decent picture of what I mean. Continue to push the dough in the center so that it begins to look more log-like (until it will fit in your 9 x 5 bread pan). Grease bread pans, put dough in, and let rise for another hour or until it is rising above the pan.

Heat oven to 375 degrees. Put a pan with hot water at the bottom of the oven before you turn it on. When pre-heated, bake the bread for 30-35 minutes, until the top is golden.


Back to Blogging and Whole Wheat Sandwich Bread

Its time, my friends, time to start blogging again! I've been busy - no-time-to-myself busy. This is why:


Yep, I had another baby! Maysa Jean was born in March after a very trying pregnancy. Whatever down time I had then was spend trying to rest. Since she has been born I've been enjoying my family, enjoying her infancy, and willing her to be little as long as possible (along with my other babies!). She is an incredible baby - happy, strong, healthy....we are all smitten with this last addition to our family.

While that is mostly still true, I'm trying to take some time for myself. Even if that means I set up an activity for the older kids, let them watch some TV, or let Maysa play with toys by my feet, I want to start writing again. The words are always in my head. Maybe I'll start making tea and try to figure out what is so great about it while I write.

My first returning post is about bread. I couldn't think of a better recipe to share than the one I've been making over and over lately for school lunches and breakfast toast. Or, my before bed snack to get me through the long hours of the night. Its a wonderful, nutritious bread that is great for sandwiches...something that is sometimes hard to come by with home made bread. It can tend to come out gummy or crumby and hard to slice - but this bread has always worked out perfectly for me.

It starts with a trick I learned with a first rising. While normally, you'd let yeast proof in warm water for 5 minutes or so, this recipe has the yeast proofing in a flour slurry for half an hour. I think it really gives the yeast a better start. It also lets the little bit of while flour you use develop its gluten so you can use a whole wheat flour for the rest of it.

Before and after the yeast develops


The whole wheat flour I use for baking is called Canadian whole wheat flour. Its processed differently than others in that the germ is actually separated from the wheat, but you still get every part of the grain. This means its better for baked goods because moisture can get to the endosperm of the wheat and develop the gluten there, making for a better structured loaf. My Mom gets this nice flour for me from a Mennonite store in Wisconsin. However, if you don't live by a Mennonite store, I'd recommend this:

Candian Whole Wheat Flour

Once you try it in place of the whole wheat flour you've been using, you won't go back!

After the yeast slurry, its your basic bread recipe. Milk gives it some heartiness, salt brings out the flavors, and honey sweetens it slightly. I put a water bath in my oven while this bakes to help keep it moist. This bread takes some time due to risings but its well worth it!

I don't add flour until the dough forms a good ball - I get it to this point, where it is still very sticky. I think this is better for a sandwich bread.

Before Rising...

After Rising!

Kneaded a few times


Formed into a ball - this is the best I could do to get a picture of how I gather it at the bottom to give it a smooth top

Keep pinching in the middle until it spreads out into a loaf shape


Rising up out of the pans

My water bath

Bread! I think I let it rise a little long because the top got a little bubbly, but that's OK. 


Perfect for my kids' PB&Js!

Recipe

Whole Wheat Sandwich Bread

1 cup warm water (115 degrees)
1/2 cup all purpose flour
4 tsp. active dry yeast
2 cups whole milk
4 Tbsp. honey
3 tsp. salt
5-6 cups Whole Wheat Flour (Canadian is best - I use this: Canadian Whole Wheat Flour)

Put warm water, flour, and yeast in the bowl of your stand mixer. If you don't have a mixer, no worry, this is a great bread to make by hand. You'll just have to knead it. Mix it to a slurry, cover, and let sit for half an hour.

Add in milk (warm to about body temperature....I microwaved it for 1 minute) and honey and mix, then add in 5 cups of the Whole Wheat flour. Mix with the paddle attachment for 4-5 minutes. Add in more flour until you get a very sticky dough, but it still gathers around the hook. You can refer to my picture above.

Put into a greased bowl and let rise for 1-1 1/2 hours or until double. Turn out and knead a few times, then cut it in half. Make a round out of each half by pushing the dough under with your fingers while to top smooths out. I tried to get a decent picture of what I mean. Continue to push the dough in the center so that it begins to look more log-like (until it will fit in your 9 x 5 bread pan). Grease bread pans, put dough in, and let rise for another hour or until it is rising above the pan.

Heat oven to 375 degrees. Put a pan with hot water at the bottom of the oven before you turn it on. When pre-heated, bake the bread for 30-35 minutes, until the top is golden.