Pages

Sunday, December 29, 2013

Irish Cream

I'll make this short and sweet. My husband and I enjoy putting a little holiday cheer in our coffee starting at Thanksgiving and ending right after Christmas. This year, I decided to make my own Irish Cream. Totally worth it, and cheaper too! Next up I plan on making homemade Kahlua!


All you need is Irish whiskey, a can of sweetened condensed milk (I considered making this myself, but most recipes called for things like butter, etc. and the ingredients here are just milk and sugar...so pretty innocent), vanilla, cream, and chocolate syrup (not pictured here, but I used my own). 

Mix it all together and refrigerate! We went through this stuff faster than I care to admit...


Feel free to use organic ingredients...I would if I had them 


Homemade Irish Cream

1 cup heavy cream
1 can sweetened condensed milk
2 T chocolate syrup
9-12 oz Irish whiskey (we used 12, of course)
1 tsp. vanilla

Mix together in a container and refrigerate for at least 3 hours. Mix before using each time.

Friday, December 20, 2013

Sweet and Spicy Cornmeal Crackers

I know, I make a lot of crackers, but they are so good! There are so many types to make too. I came up with this one yesterday in my kitchen because I wanted something different...something original I could give all my friends for the holidays. So I invented these cornmeal crackers. I'm really into cornmeal this year. I love the texture it gives baked goods and it is a whole grain. These packed up great as gifts because they got perfectly crunchy.

I think these would go great with anything. I really liked spreading some cream cheese on them yesterday because it is a nice compliment to the little bit of bite they have. They aren't all that spicy...there is just a little heat at the end. If you wanted them spicier, just add more cayenne pepper, or even add in some red pepper flakes to the mix.

The slight sweetness to the cracker comes from brown sugar and the heat from cayenne. This is all done in a food processor. I have a dough blade I use with mine, but it'll work in any food processor. You can also mix the ingredients by hand in a bowl. Just make sure you knead the dough so it forms a ball and isn't too sticky.


 Add the buttermilk slowly and stop when a ball of dough forms. You probably won't use all the buttermilk. Also, I make my buttermilk by just adding a tablespoon of vinegar to a measuring cup and then filling it to the one cup line with whole milk. This is actually a lot less processed than the "buttermilk" you get at the store. So unless you are making your own butter and have real buttermilk, this is what I suggest doing.


Here is my ball
 Knead a bit in corn flour to bring it all together...


I made a double batch, so I got two rounds of dough

After it rested for a bit in the fridge, I rolled it out on my silpat until it covered the whole sheet. Then I used my pizza cutter to cut the crackers.


I pricked them with a fork to avoid air pockets..


And baked them for 22 minutes at 375 degrees. That was the magic number for my oven. I'd set your timer for 15-18 minutes and watch them. You want them to be brown but not getting near burnt.


These fit nicely in these cardboard gift bags from Hobby Lobby.


They get really crunchy once cool (must let cool!) and have somewhat the texture and crunch of a graham cracker...but they have that corn flavor and a little more grit to them.

Sweet and Spicy Cornmeal Crackers

1 cup white whole wheat flour
1 cup yellow cornmeal (I used fine cornmeal)
1 tsp. salt
1/2 tsp. baking soda
1/4 tsp cayenne pepper (or a bit more if you want it spicier)
3 Tbsp. brown sugar
4 Tbsp. butter, cold and cut into pieces
3/4 cup cold buttermilk

Combine flours, salt, baking soda, cayenne pepper, and brown sugar in the bowl of your food processor with the blade in. (Use a dough blade if you have one). After that is well mixed, add in the butter and mix until crumbly. Slowly poor in the buttermilk until the dough forms a ball. Turn out onto a surface dusted with cornmeal and knead into a ball. Cover and let rest in the fridge for at least 15 minutes.

Preheat oven to 375 degrees. Roll dough out onto a silpat (or parchment paper) on a standard size cookie sheet. Roll is fairly thin - 1/16 to 1/8 inch. Cut into squares with a pizza cutter or very sharp knife. Poke holes with a fork in each cracker. Bake for 18-22 minutes, or until browned. They won't be crunchy when they come out of the oven. They will firm up as they cool.

I think these would be great served with an onion dip or even some apple butter. Enjoy!

Tuesday, December 17, 2013

GG's Shortbread

As my son will tell you, "Making something is one way to say I love you". It is a song he learned from Daniel Tiger and he sings it all the time. He is big enough now to understand the meaning of this season and how our family views Christmas, gift-giving, and being together. He knows that when you do something nice, it makes another person feel good. He also knows that it is even better if we make it with love.

That is what these cookies are. Love. Love, because they require a little effort, a little time, and a little patience. Love, because not a whole lot else goes into them. Love, because this recipe is a family heirloom, and one I am proud to make all throughout the year for gifts and for my family. My stepson is always asking me what my "secret ingredient" is in my cooking. I tell him it is love, because that is the honest to goodness truth. Forget the love, and food goes from something special to mere sustenance.

This recipe was my Great Grandmother's on my Mother's side. I called her GG, and I named my daughter after her (Allison). I was 10 when she passed away at the ripe old age of 102. These cookies remind me of her. I had a hard time deciding to share this recipe, simple as it is. I've shared it to many but putting it out there to the world made me feel like it wouldn't be as special. Then I remembered that it isn't the ingredients, the technique, or the tasty results. It is the love that make these cookies special...and it is the love that gives simple ingredients their magic.

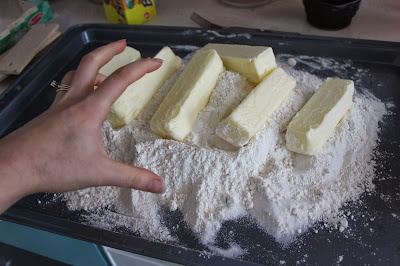
It starts with a big pile of flour. I used a half sheet pan, so made a larger recipe than usual. The recipe below is for a standard cookie sheet, which most people have and will use. To make a larger batch, it is pretty simple to figure out how much of each ingredient you need.


Then some sugar, and lots of butter. My batch used 6 cups of flour, 1 1/2 cups of sugar, and 6 sticks of butter. Yes, it is a lot of butter....but these cookies get all their flavor from yummy butter.


From here, you smash, mash, mix, crumble, and make a big fat mess!!! Go for it!

STOP!!!!

Take your rings off. You'll thank me.


Better. Now, go for it! Mash and mix until it is all mixed together and uniform. It'll be crumbly like pie crust, which is exactly what you want. Sure, you can try making this dough in a mixer and avoid some mess and keep your hands clean, but they won't come out as good without this effort. This is the love people, this is it right here.

Also, more scientifically, when you use your mixer you will incorporate air and overwork the dough, making it tough. This is a simple recipe, but mixing by hand is a must if you want the best cookies.


I had to go in with both hands here, so I put my camera down.


So everything is mixed together now. Notice the crumbs all over the place. Perfect.


Distribute the dough all over the cookie sheet...


And press down hard with your hands to make a mostly even sheet of cookies. It doesn't have to be perfect (just like love is not perfect).


To fancy up the top and even out the dough for better baking, take a fork and run it along the top of the cookies, applying some pressure.


So you get lines like this.


Then bake at 350 degrees for about 15-20 minutes. Here is where the patience comes in. You do NOT want to over-bake these. Some people I have heard like the brown, crunchier cookies. Well, that is great for them. They can have the edges. I prefer the "just a few seconds of baking time over being raw" pieces. In fact, this dough is pretty good raw. No eggs, either. You want to bake them until they are just barely turning brown around the edges. Set your timer for 10 minutes at first, even though they won't be done. You just want to keep an eye on them.

These are perfect!


If you wish, you can lay some chocolate bars on top of the hot cookies so it melts on there.


And then spread it around for a chocolate-topped shortbread cookie. This is not part of the original recipe, but I can't help but add chocolate to just about everything. My mom dips the individual cookies in chocolate to make them extra special. I used dark chocolate. Make sure you don't try using chocolate chips. That won't work.


For purists, which I am sometimes with these, I only covered half with chocolate.


Another very important thing about these cookies. You must cut them when they are hot. If you want until they cool, you'll have issues.


Cut and now we wait for them to cool!


Once they are cooled (or mostly - you might want to just try one to make sure it has plenty of love before they are completely cool) you can take them out and do as you wish with them. Package them, put them in gift bags, bring them to your neighbors...or delight your husband when he comes home on his lunch break.


I put them in a cute box to take as gifts to several different places tomorrow. The cookies on the right are a simple no-bake cookie to round things out. You can find that recipe here.


Also, I like to cut these cookies pretty small. One of the many things my children have taught me is that lots of love can come in a tiny little package. Make these bite-sized and you can grab one here, grab one there. It is a little taste of love. How many time can I say "love" in this post??

GG's Shortbread Cookies

4 cups all purpose flour
1 cup sugar
4 sticks (1 lb) butter, softened

Place all ingredients on a cookie sheet and mash together with your hands until everything is incorporated together. Spread out on the cookie sheet and press down to a mostly even layer. Make lines with a fork over the whole batch. Bake in a 350 degree oven for about 15 minutes, or until just barely turning brown around the edges. If desired, top with chocolate bars and spread on after they melt. Cut the shortbread into pieces while warm. Let cool before taking out and packaging.

These will keep for a long time. I've never had them last long in my house, but have seen them last months!

Thursday, December 12, 2013

Potato-crusted "quiche"

For a while, our chickens went on a little strike and we were barely getting an egg a day. Then we put a light in their coop, gave them more food, and we once again have a surplus of eggs! While John and I, and sometimes the kids, have an egg for breakfast, extras are adding up. So every once in a while I need to make something that uses a lot of eggs for dinner. I've made eggs in purgatory several times, as well as your standard french toast and good ol' scrambled eggs and toast. Last night I wanted something different though, and decided to make a quiche. 


What I did not want to do was make pie crust. I also had leftover potatoes, so decided to make this potato-crusted quiche. I also used just a little bit of milk and not cream, so over all I'm not quite sure this should be classified as a quiche. It is an egg bake...maybe a cross between a fritatta and and quiche. What I'm sure of is it is delicious, and my whole family agreed. 

You can use whatever "fillings" you have on hand. I had frozen broccoli, onions, leftover shredded carrots from making carrot cake, and lots of leftover cheese from the cheese plate at my daughter's birthday party. So this is a vegetarian dish but you can easily add ham, bacon, shredded chicken, or any other sort of meat you like. 

I started by slicing my potatoes kind of thin and roasting them in some olive oil at 375 degrees. I wanted them to be cooked but not crispy. 


Meanwhile I sauteed my onions over medium low heat so they would carmelize.


I layered the potatoes in the bottom of my foil-lined cake pan. If my spring form pan hadn't just died, I would have used that. For some reason all the non-stick coating started to come off of it though, so this is my makeshift way of trying to bake eggs. I oiled the foil really well. 

I wanted the potatoes to form a sort of crust so I weighted them for a bit to get them kind of smushed together.

My egg filling was just 10 eggs and maybe a half a cup of milk. Most quiches use less eggs and more milk/cream, but I really just wanted to use up my eggs and make more of an oven omelette, if you will.


Over the potatoes went the onions.

Then my shredded carrots.

Then the broccoli

And finally the cheese!

I poured my egg batter all over

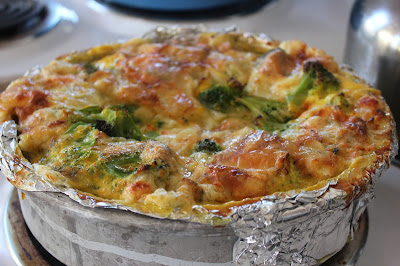
And baked for about an hour and 20 minutes. I is nice an puffy when it comes out of the oven but like all good souffles it fell pretty quick.


I took the whole deal out of the pan - foil and all - and unwrapped it. My good oiling came in handy here.


It looked and smelled delicious!

Now here is a trick about quiche. You have to wait for it to cool before you cut it. Then heat it back up again before eating. It just slices so much better. I took a slice out while the sun was still out to get a decent picture. Isn't it pretty?

Baby girl liked this especially. She is my good eater. Ao you can see, the potatoes didn't really form all that great of a crust, but it came out fine anyway. It came out of the foil perfectly and all that matters is the taste!


Potato-Crusted Quiche

1 to 1 1/2 lbs red potatoes, sliced this (about 1/4")
2 Tbsp. olive oil
1 onion, sliced thin
1 1/2 cups broccoli florets
1 cup shredded carrots
10-12 oz cheese, sliced or shredded
10 eggs, beaten
1/2 cup milk
1 tsp. salt
1/2 tsp. pepper

Place the potatoes and 1 tbsp. olive oil in a bowl and toss together. Lay the potato slices on a baking sheet and bake at 375 degrees for about 25-30 minutes until completely cooked. While they are baking, sautee the onions in the other Tbsp. of olive oil on medium low heat for about 20 minutes until they are soft and brown.
Generously grease a spring form pan or a foil-lined 9 inch cake pan with a depth of 3 inches. If you try using a pie plate, or a smaller cake pan, you'll have eggs all over the bottom of your oven.
Arrange potatoes in the bottom of the pan o they cover the bottom. If desired, press down with a small plate and something heavy.
Layer the onion, broccoli, carrots, and cheese on top of the potatoes. Combine the beated eggs with the milk, salt, and pepper and pour over the fillings. Bake at 375 degrees for about an hour and 20 minutes. I set my alarm for an hour and checked it every 10 minutes after that. It is done when the filling stops giggling when you gently shake the pan. Cool at least an hour before slicing, and if desired, reheat in the oven or microwave before serving.